


Acrylic sheets are a versatile material used in various DIY, retail, signage, and professional projects. However, cutting acrylic sheets properly requires the right tools and techniques to achieve precise results. In this guide, we'll explore common methods for cutting acrylic sheets: Sawing, Router, hand and Laser Cutting.
Sawing Acrylic Sheets
Sawing acrylic sheets demands finesse and precision to achieve clean, accurate cuts. In this section, we'll explore three popular tools for the job: the table saw, circular saw, and jigsaw. Each offers unique advantages and considerations, empowering you to choose the right tool for your project.
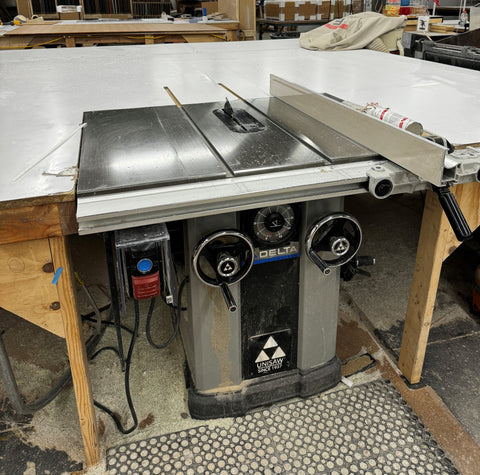
How to cut acrylic sheets with a table saw
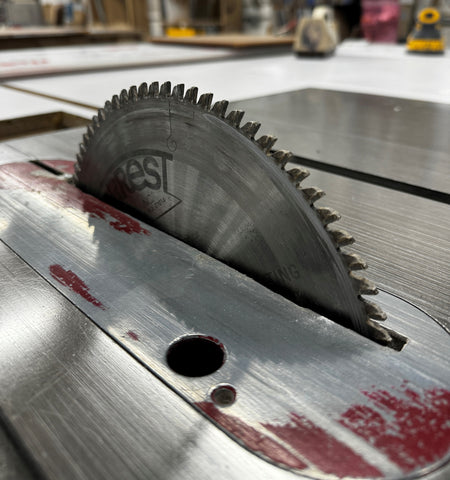
A table saw offers stability and accuracy, ideal choice for cutting acrylic sheets. Be sure to leave protecting papering on when cutting. Ensure your saw is equipped with a fine-toothed blade for plastics, and adjust the height slightly higher than the sheet's thickness.
When cutting, maintain a slow, steady feed rate to prevent chipping and melting. Consider a zero-clearance insert for added support. If lacking a fine-toothed acrylic blade, use a blade with a high tooth count, and secure the sheet firmly with clamps.
Pro Tip: When cutting acrylic, don't use blades that are meant for rough cutting or ripping purposes. Use a fine-toothed saw blade like our Craftics saw blades for a cleaner, more professional edge.
Need help with your next project? T&T Plastic Land offers custom acrylic fabrication services at our state of the art NYC plastics fabrication shop.
How to cut acrylic sheets with a with a jigsaw
Ideal for curved cuts and intricate designs but also can be used for straight cuts, the jigsaw is a versatile tool for cutting acrylic sheets. Again, be sure to leave protecting papering on when cutting. Choose a jigsaw blade designed for cutting plastics, featuring fine teeth and a downward-cutting action to minimize chipping.
Clamp the acrylic sheet securely to your work surface and use a straight edge or template to guide the jigsaw along the desired cutting line. Maintain a steady hand and a slow, consistent feed rate to achieve clean, precise cuts.
Pro Tip: If you don’t have an acrylic blade, opt for a sharp fine-tooth blade, ideally with 8-12 teeth per inch. After cutting, use sandpaper with a fine-grit bit to refine the edges for a professional finish.
How to cut acrylic sheets with a circular saw
To cut acrylic sheets with a circular saw, begin by selecting the appropriate blade designed specifically for cutting plastics or acrylic. Measure and mark the acrylic sheet with a straight edge and marker, ensuring accuracy in your measurements. Secure the acrylic firmly to your work surface using clamps, making sure they won't interfere with the saw's path.
Adjust the saw's blade depth to slightly deeper than the thickness of the acrylic sheet to minimize chipping and melting during cutting. Start the saw and guide it slowly along the marked cut line, applying steady, even pressure. Be cautious not to push the saw too quickly to prevent chipping or melting. Allow the saw to do the work.
Pro Tip: Periodically stop cutting to let the acrylic cool down or mist it lightly with water to reduce melting. Once the cut is complete, inspect the edges for rough spots or burrs and smooth them out using sandpaper or a file.
Need help with your next project? T&T Plastic Land offers custom acrylic fabrication in our state of the art NYC plastics fabrication shop is family owned and conveniently located in Brooklyn, NY.
How to cut acrylic sheets with a Dremel rotary tool
Cutting acrylic sheets with a Dremel rotary tool involves several steps to ensure clean and precise cuts. Rotary tools are good for curved cuts and intricate designs. Begin by selecting the appropriate cutting wheel attachment suitable for acrylic. Diamond-coated cutting wheels or fiberglass reinforced cutting discs are commonly used for this purpose. Mark the desired cut line on the acrylic sheet using a marker or painter's tape, ensuring accuracy in your measurements.
Secure the acrylic firmly to your workbench or table with clamps to prevent it from moving during cutting. Attach the cutting wheel to the Dremel according to the manufacturer's instructions and set it to a medium speed. Carefully guide the cutting wheel along the marked cut line, applying gentle and consistent pressure. Allow the Dremel to do the work, avoiding excessive force.
Once the cut is complete, inspect the edges for any rough spots or burrs and smooth them out using sandpaper or a file. Cutting acrylic with a Dremel rotary tool can yield clean and precise cuts when done with patience and care.
Pro Tip: Periodically stop cutting to let the acrylic cool down, as cutting generates heat which can cause melting.
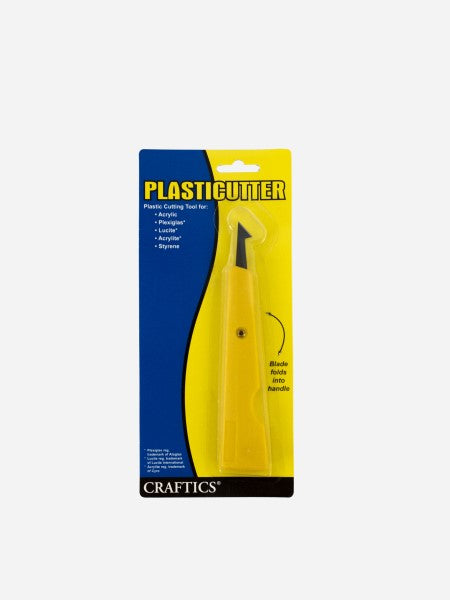
Cutting Acrylic Sheets by Hand
Cutting acrylic with a scoring knife, also known as a plastic cutter or acrylic scoring tool, is a simple and effective method that doesn't require power tools. Scoring knifes only work on thin acrylic.
How to cut acrylic sheets with a scoring knife
Lay the acrylic sheet on a flat surface and measure and mark the line where you want to make the cut. Using the acrylic scoring knife, apply firm, even pressure as you pull the blade towards you along the marked cut line, ensuring it's deep enough with multiple passes if necessary.
Once scored, position the scored line along the edge of a table or workbench, and apply downward pressure on the waste side to snap the acrylic cleanly along the scored line. Cutting acrylic with a scoring knife is a manual process that requires patience and precision but can yield clean and accurate results.
Pro Tip: After hand-cutting acrylic, smooth out any rough edges with sandpaper or a file. For small projects with fine details, use an emery board to smooth inside corners and points.
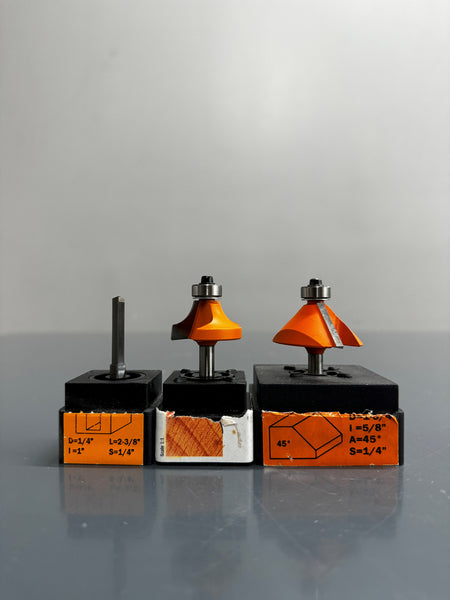
Cutting Acrylic Sheets with Routers
How to cut acrylic sheets with a hand router
Cutting acrylic with a router can produce clean and precise edges, making it suitable for projects requiring intricate cuts or detailed designs. Start by selecting a router bit specifically designed for cutting acrylic, such as a carbide-tipped straight bit or a spiral upcut bit.
Secure the acrylic sheet firmly to your workbench or table using clamps, ensuring it won't move during cutting. Set up the router with the chosen bit and adjust the cutting depth to slightly deeper than the thickness of the acrylic sheet. Turn on the router and guide it along the marked cut line, moving in a smooth and steady motion. Take care to maintain a consistent speed and avoid pushing the router too quickly, as this can cause chipping or melting.
If cutting intricate shapes or curves, consider using a template or guide to ensure accuracy. Once the cut is complete, turn off the router and inspect the edges for any rough spots or burrs. Use sandpaper or a file to smooth out any imperfections.
Acrylic routing requires patience and precision, but it can result in clean and professional-looking cuts for a variety of projects.
How to cut acrylic sheets using a CNC router machine
Cutting acrylic sheets with a CNC router machine offers precise and automated control over the cutting process, making it ideal for complex shapes and designs. To begin, create a digital design file of the desired shape using computer-aided design (CAD) or computer-aided manufacturing (CAM) software. Ensure the design file is compatible with the CNC router machine's software.
Next, securely mount the acrylic sheet onto the CNC router bed using clamps or vacuum hold-down systems to prevent movement during cutting. Load the design file into the CNC router's control software and configure the cutting parameters, such as cutting speed, depth, and tool selection.
Start the cutting process, and the CNC router bits will automatically follow the programmed toolpaths to cut the acrylic sheet according to the design specifications. Monitor the cutting progress to ensure accuracy and make any necessary adjustments to the cutting parameters as needed.
Once the cutting is complete, remove the acrylic sheet from the CNC router and inspect the edges for smoothness and accuracy. Sand or file any rough spots if necessary.
Pro Tip: Cutting acrylic with a CNC router machine allows for precise and repeatable results, making it suitable for a wide range of applications in various industries, including signage, prototyping, and manufacturing.
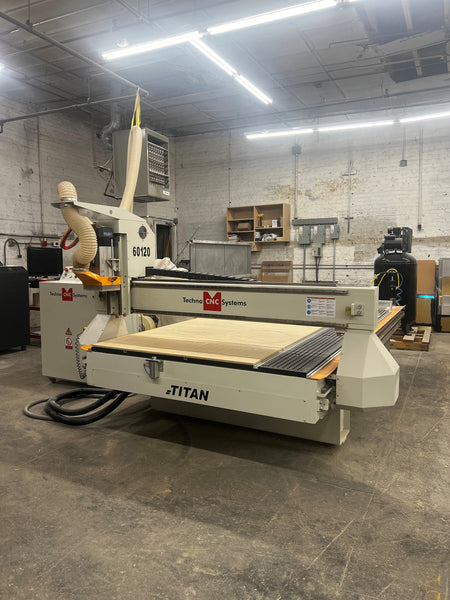
Need some help with your next CNC routing project? T&T Plastic Land offers CNC Routing services for acrylic, wood, and more. All work takes place in our state of the art plastics fabrication shop in Brooklyn NY
Laser Cutting and Engraving Acrylic
Acrylic laser cutting and engraving offers high precision and versatility. To begin, create a digital design file of the desired shape and engraving pattern using vector graphic software such as Adobe Illustrator or CorelDRAW. Ensure the design file is compatible with the laser cutting and engraving machine's software.
Next, securely place the acrylic sheet onto the machine's bed, ensuring it lies flat and is properly aligned. Import the design file into the laser cutting and engraving machine's control software and configure the cutting and engraving parameters, including laser power, speed, and frequency. Depending on the desired outcome, you may need to set different parameters for cutting and engraving.
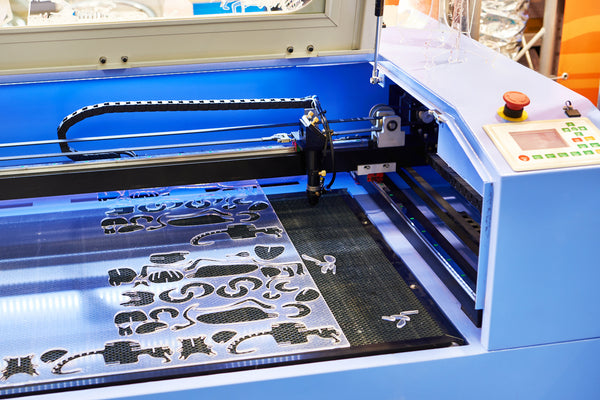
Start the acrylic laser cutting and engraving process, and the laser will follow the programmed paths to cut through the acrylic sheet and engrave the desired pattern or text onto its surface. Monitor the cutting and engraving progress to ensure accuracy and make any necessary adjustments to the parameters.
Once the cutting and engraving are complete, remove the acrylic sheet from the machine and inspect the results. Depending on the design, you may need to clean the acrylic surface to remove any residue left from the cutting and engraving process.
Cutting and engraving acrylic with a laser machine allows for precise and intricate designs, making it popular in professional applications, including signage, awards, and artistic applications.

T&T Plastic Land offers Laser Cutting and Laser Engraving services for acrylics, wood, and more.
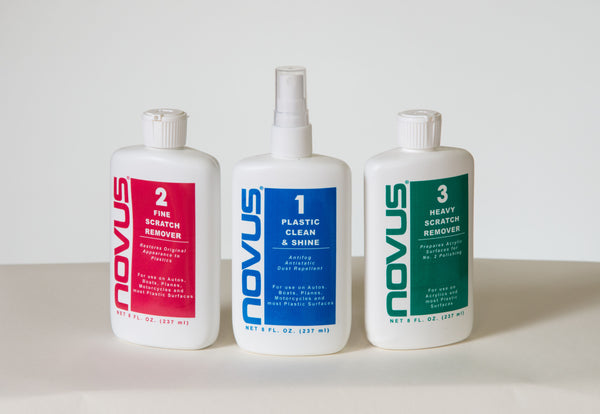
How to Sand and Polish Acrylic Sheets
Sanding and polishing acrylic edges is essential for achieving a smooth and professional finish. Begin by selecting coarse-grit sandpaper, around 120 or 180 grit, to eliminate any rough edges or burrs left from cutting.
Hold the sandpaper firmly and sand the edges of the acrylic in a back-and-forth motion until they feel smooth to the touch. Progress to finer-grit sandpaper, such as 320 or 400 grit, to further refine the surface.
Once the edges are adequately smoothed, it's time to polish them for enhanced clarity and shine. Apply a small amount of plastic polish or specialized acrylic polishing compounds to a soft, clean cloth. Gently buff the edges of the acrylic in a circular motion, ensuring thorough coverage. Continue polishing until the edges become clear and glossy, revealing the beauty of the acrylic material.
This process not only improves the aesthetics but also helps to maintain the integrity of the edges. Finally, wipe off any remaining polish residue with a clean, dry cloth to reveal the smooth and polished acrylic edges.
Safety Precautions while Cutting Acrylic
- When cutting acrylic, prioritizing safety precautions is essential to prevent accidents and minimize health risks.
- Always wear appropriate protective gear, such as safety goggles or a face shield, to safeguard your eyes from flying debris.
- Wear a dust mask to protect your lungs from inhaling acrylic dust.
- Work in a well-ventilated area to reduce exposure to fumes and dust or use a fume extractor to remove airborne particles.
- Choose the right cutting tool for the job and ensure it's in good condition.
- Secure the acrylic sheet firmly in place during cutting to prevent movement and reduce the risk of accidents.
- Adjust the cutting speed and depth of power tools to match the thickness of the acrylic sheet, minimizing the likelihood of overheating, melting, or chipping.
- Take breaks during extended cutting sessions to allow the acrylic to cool down. Be cautious when handling acrylic after cutting, as edges and surfaces may be hot.
By following these safety precautions, you can minimize risks and ensure a safe cutting process when working with acrylic.
Need help with your next project? T&T Plastic Land offers custom acrylic fabrication, CNC routing, laser cutting services, plus wood fabrication and more! Contact us for more information, or come visit us at our state of the art fabrication shop in Brooklyn, NY.


